Azure Pipelines - Basics
Classic and YAML pipelines
There are two flavours of pipelines in the azure devops. The Classic (driven by user interface) and then YAML (also called multistage) pipelines. They both serve the same purpose - continuous integration (CI) and continuous delivery (CD) of your code.
There is one very significant difference between these two types. Classic pipelines are maintained via user interface and that brings in a few problems. It's very tedious to "copy" the pipeline into new project - you must manually "re-create" all tasks in the web interface. Also - there is not track of changes made to the pipeline - so if someone elses changes you pipeline, there is no way what that change was and also when it happened.
On the other side - YAML pipelines are defined in the code and they are usually part of you application repository. So you can apply all "pull request" policies and run different version of pipelines fro different branches if you wish. Also, since all changes are stored in git repo, it's very easy to rollback or "copy" pipelines into new projects. So for these reasons, we are going to focus on multistage pipelines in this serie.
Building blocks
On the top level of every YAML pipeline sits at least one "Stage" - each stage contains at least one "Job" and each job contains at least one "Step".
Stages are usually sets of jobs which are accomplishing a single logical event in lifecycle of your application. So you can have stage "Build", followed by "Test" and "Publish artifact". Or have a "Build, test and publish artifact" as a single stage followed by set of deployment stages for every environment. Stages run sequentially, next stage always waits for the previous to finish. You can control the flow between stages with manual approval checks.
Each jobs runs on single agent and they run run in parallel. You can chain them and control them with conditional logic. So within one stage you can first run job "Build application" and then trigger two jobs in paralel to execute "Unit tests" and "Integration tests".
The smallest unit of work in the YAML pipeline is called a Step. It can be as simple as one liner in bash, or more complicated as a special deployment of docker container into kubernetes cluster. Tasks run sequentailly and you can control their execution with special conditions, based on result of previous tasks or custom logic.
Seting up your first pipeline
First of all, you will need a place to store your YAML file. So create a new repository in your project, then go to Pipelines, click on "New Pipeline" button. Pick the repo you created in the first step and select "Starter Pipeline". Azure will generate a very basic pipeline for youbut copy and paste the following code into the editor.
trigger:
- master

pool:
  vmImage: ubuntu-latest

stages:
- stage: "BuildAndTest"
  displayName: "Build and Test"
  jobs:
  - job: BuildAPI
    displayName: Build API
    steps:
    - bash: "echo building API"
  - job: BuildClient
    displayName: Build Client
    steps:
    - bash: echo "building Client"
  - job: Test
    dependsOn:
    - BuildAPI
    - BuildClient
    displayName: Test API & Client
    steps:
    - bash: echo "testing API & Client"

- stage: "DeployUAT"
  displayName: Deploy to UAT
  jobs:
  - job: Deploy
    steps:
    - bash: echo "Deploying"
  - job: E2E
    dependsOn: Deploy
    steps:
    - bash: echo "Running E2E tests"

- stage: "DeployPROD"
  displayName: Deploy to PROD
  jobs:
  - job: Deploy
    steps:
    - bash: echo "Deploying"
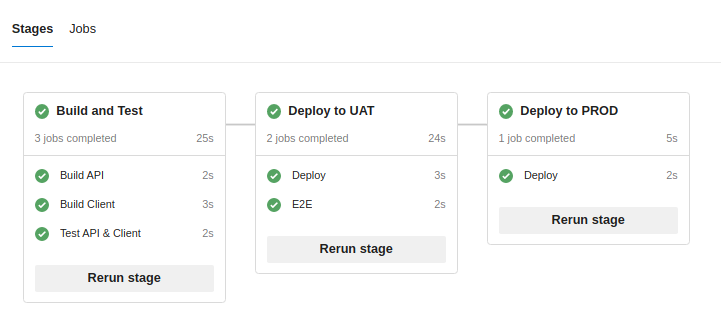
After you hit "Save and Run", you should end up with following result. Congratulations, you've just successfuly ran your first multistage pipeline in azure devops!
How does it work
Let's just quickly go through this sample pipeline from the top to bottom. You will notice that we used "dummy" bash steps to simulate all neccessary steps - but thats enough for this quick demonstration.
At first we declare when the pipeline should run using a trigger. So any time someone commits any code into the master branch, this pipeline will start execute it's code.
The pool keyword specify which image (or "operating system") should be used for the execution - in this case, we target latest version of ubuntu.
Then we start defining stages (remeber, stages run in sequence).
We call first stage "BuildAndTest" and give it a user friendly label "Build and Test". We specify three jobs in this pipelines. First two (BuildAPI and BuildClient) run simultaneously - the third depends on them and will start running after both of them successfuly finishes.
We use second stage for deployment and E2E tests in the UAT environment. So again, we define two jobs - first one (which triggers immediately) deploys our code. The second will wait for the deployment to finish (since we said "dependsOn") and then execute our E2E scripts.
Last stage will simply deploy the code to Production environment.
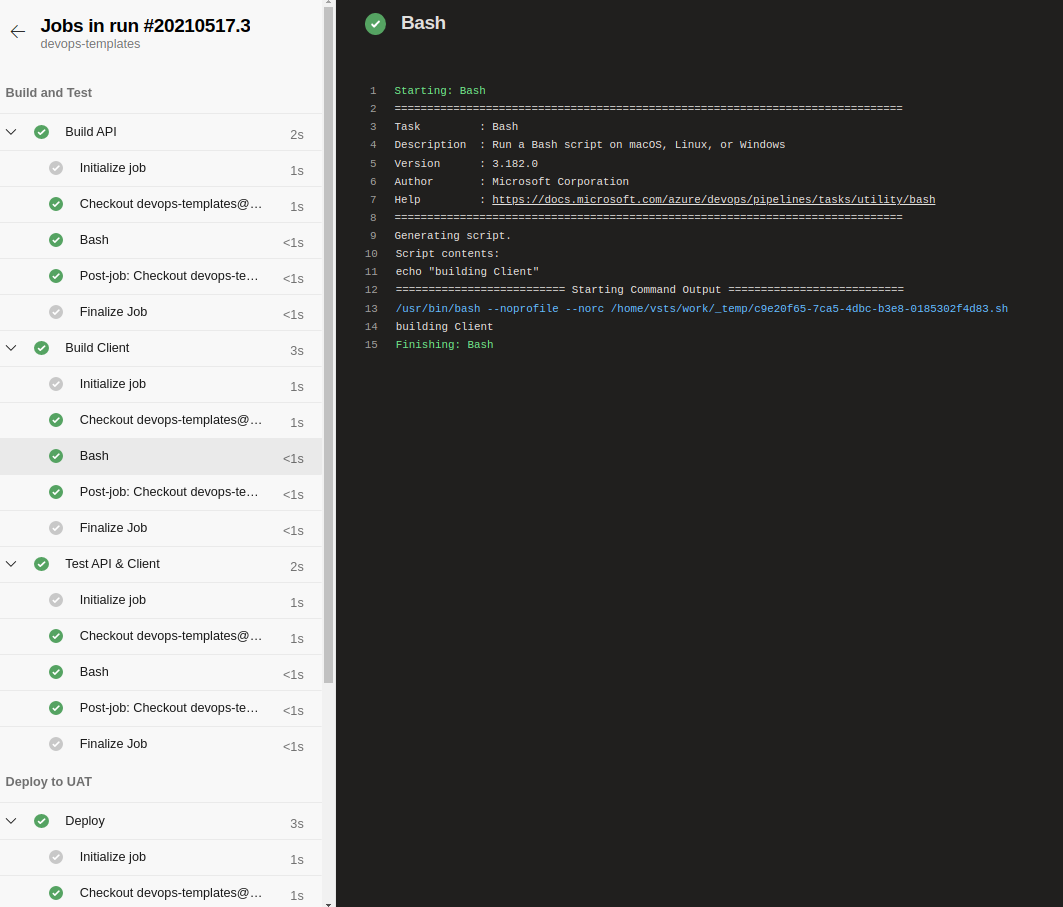
You can see more details when you click on any of the jobs in the UI - you should see a similar screen as below with all logs and context information from azure - plus you can also output them in the standard text log.
In the next part of this series we will take deeper a look on parameters, variables and expressions - all of which you can use to make your pipelines as smart and complicated as possible.
Comments